Introduction
The Organization tab defines your network and service architecture to ClearIP. Defining the network organization is useful for organizing or routing calls, setting up fraud control, and creating analytics. The Organization section allows you to define your SBC device and define your network structure for ClearIP.
This feature allows you to organize calls into various logical groupings, perhaps based on location, user attributes or different customer segments.
Network organization
The following figure shows examples of two possible network organizations within ClearIP:
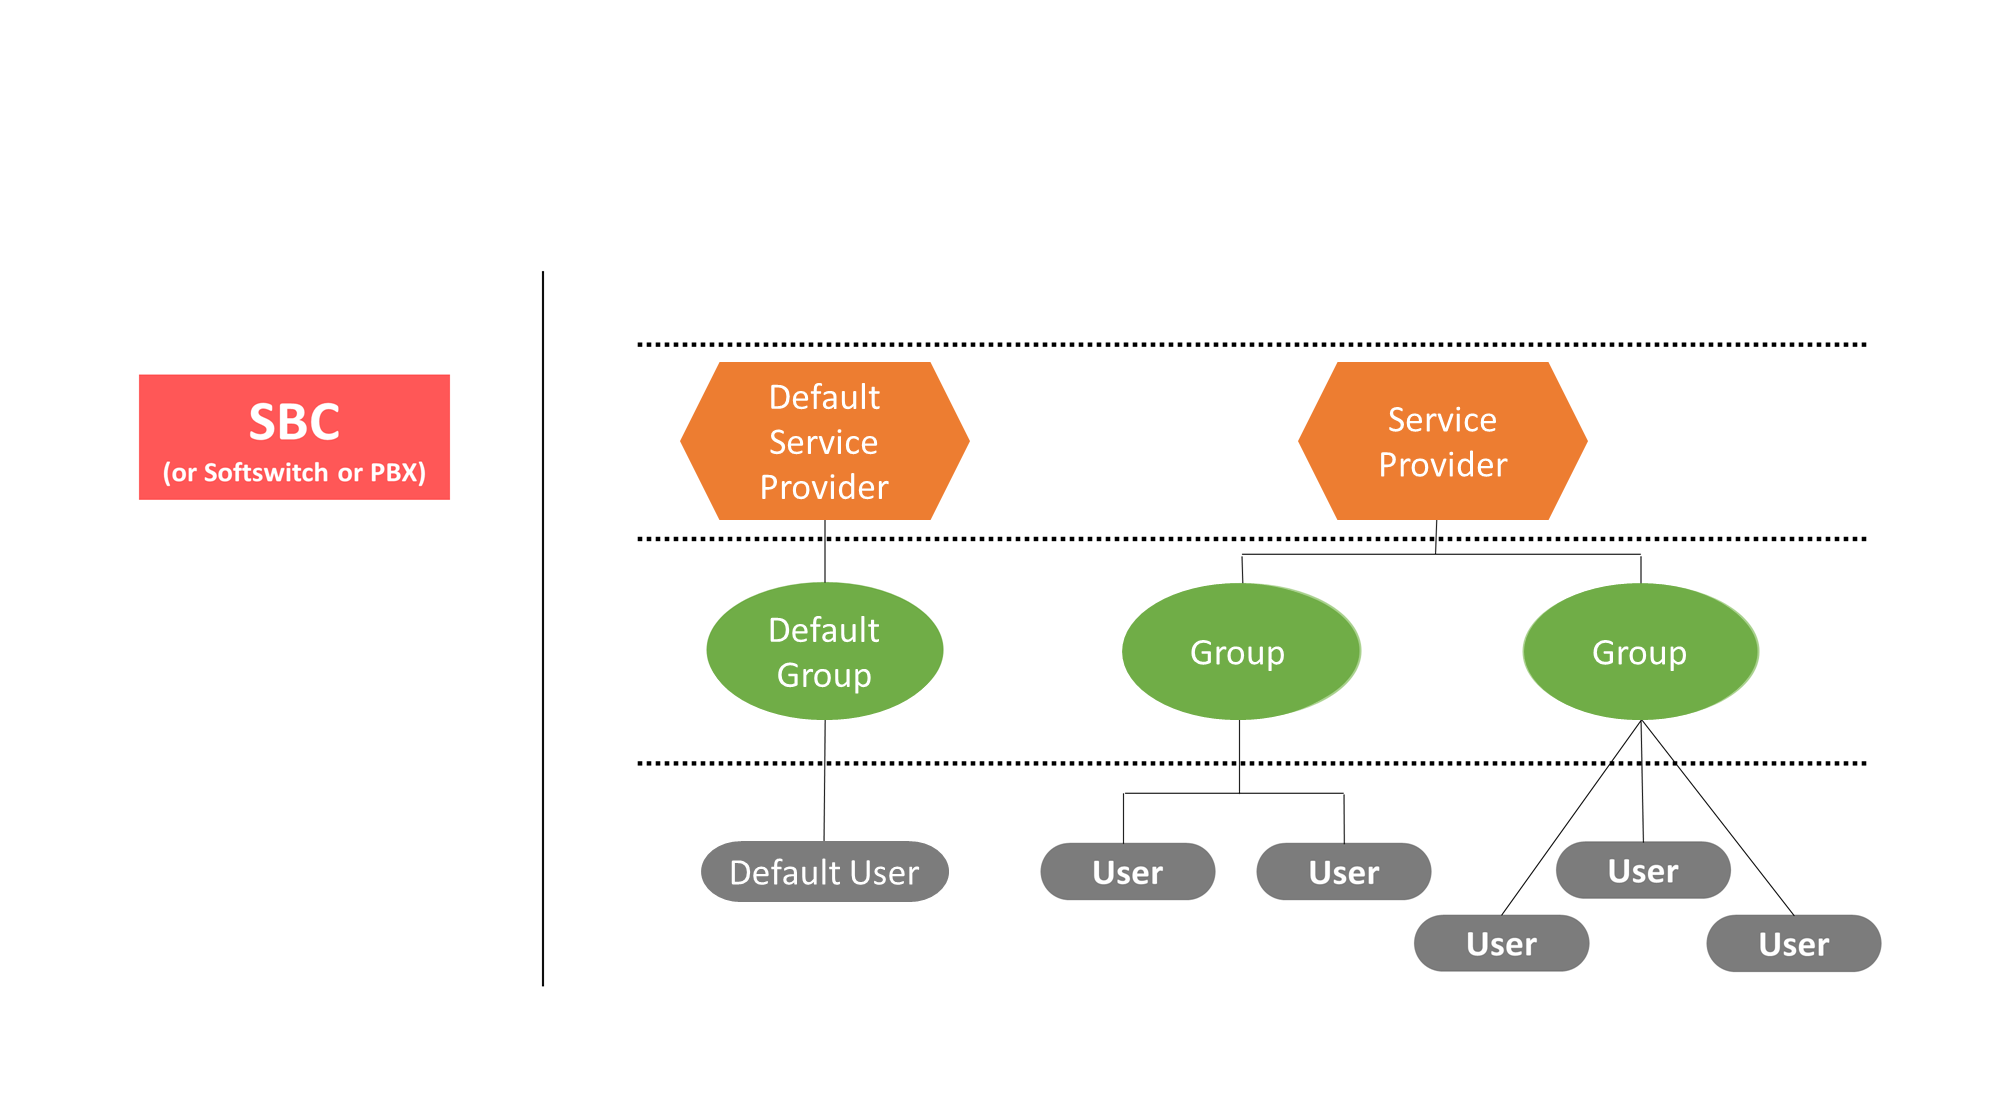
In ClearIP, all network structures can be defined as a hierarchy with up to four levels:
Operator - a collection of SBCs, Service Providers, and ClearIP policies. Operators are considered isolated tenants within ClearIP. Each Operator can have its own set of SBCs, Service Providers, Groups, and Users, Number Translation Rules, and policies. Policies configured in one Operator do not affect calls associated with a different Operator.
For STIR/SHAKEN authentication, each Operator must have its own STI Certificate created. If you have 2 Operators which both require STIR/SHAKEN authentication, then the STI Certificate monthly costs are double a single STI Certificate cost.
Service Provider - a collection of Groups. A Service Provider in ClearIP is not necessarily a real service provider. Like a Group, the Service Provider is not strictly defined. To organize Groups by geography, Service Providers could be states, regions, enterprises, or something else. A Group can only belong to one Service Provider.
Group - a collection of Users. A Group is not strictly defined. Reasonable choices for Groups typically depend on your network organization. For example, to organize Users by geography, Groups can be cities, states or regions. A User can only belong to one Group.
User - represents a call source such as a subscriber, trunk group or SIP peer. Users can be defined by only one of the following identifiers transmitted to ClearIP in a SIP INVITE message:
- IP address
- Originating trunk group
- User ID
- Calling telephone number.
The SBC (Session Border Controller) is any network device that sends SIP INVITE messages to ClearIP. ClearIP uses the general term SBC to represent any SIP device, such as a softswitch, Private Branch eXchange (PBX) or SIP proxy. ClearIP only accepts SIP INVITEs from IP addresses that are configured as an SBC. All other network traffic is refused by ClearIP.
When ClearIP receives a SIP INVITE from an SBC, it matches the INVITE to a specific User, Group, Service Provider, and Operator by searching the INVITE for information that identifies the User.
In some cases, it may not be necessary to define multiple Users, Groups, Service Providers, and Operators at all, but defining them can be helpful for taking advantage of additional ClearIP features.
However, for simplicity, all calls can be associated with a single default User, Group, Service Provider, and Operator. Having a Default User ensures that every SIP INVITE from your SBC will be processed by ClearIP. Having this configuration still enables you to use all of ClearIP’s essential features.
Initial Setup
Add Operator
If your account has access to the Operator page under the Organization menu, then you must create an initial Operator to conduct testing. If your account does not have access to the Operators page, then you can skip this step.
Open the Organization menu and go to the Operators page. Click the Add button to create a new Operator. You only need to add an Operator name and then submit the change. The name can be changed at any time, so initially you can set the Operator name as your organization name.
The completed Operator should look like this. 
Later, you can add additional Operators based on your requirements.
Add SBCs
Visit SBCs for more detailed information on setting up SBCs.
For setting up the Organization tab, you will need the public address of your Session Border Controller (SBC), softswitch, or Private Branch eXchange (PBX). This is the IP address that will send SIP INVITE messages to sip.clearip.com.
Click the Organization tab and select the SBCs option to display the SBC screen. Click the Add button to fill out the form for adding SBCs.
- Enter a display name for the SBC and add the public IP address of the SBC. We recommend that the SBC display name be a meaningful name that is easy to remember.
- Select any other appropriate options. Your SBC will show up in the SBC window as below:

Add Default Service Provider, Group, User
The recommended best practice for initial testing is to add a Default Service Provider, Default Group, and Default User. These default settings will ensure that every call from your SBC will be mapped to a ClearIP user and processed. If a call cannot be mapped to a ClearIP user, ClearIP will return a SIP 403 Forbidden message. Later, you can add more Service Providers, Groups, or Users based on your requirements.
If your account has provisioned multiple Operators, then each Operator must be configured with its own Default Service Provider, Default Group, and Default User.
Add Default Service Provider
Click the Organization tab and select the Service Providers option to display the Service Providers screen. Click the Add button to fill out the form for adding Service Providers. Add a Default Service Provider to get started. 
Add Default Group
Once you create a Default Service Provider, create a Default Group within the Default Service Provider. Select the Groups option in the Organization tab, and then click the Add button to add the Default Group. After creating Default Group, you can create more targeted groups to categorize your calls. 
Add Default User
Select the Users option within the Organization tab, then click the Add button to add the Default User. In the Service Provider and Group fields, select the Default Service Provider and Default Group you created previously. Enter “Default User” as the User. For getting started with the Default User, you can leave the header and tag identifier fields blank. Later, you can add more users if needed. 
Distinguish Inbound and Outbound Calls
If ClearIP will be used to simultaneously process both inbound (PSTN-to-provider) and outbound (provider-to-PSTN) calls, then ClearIP must be able to distinguish inbound and outbound call directions.
If you plan to only send calls of the same direction to ClearIP such as only using ClearIP to monitor outbound calls, then you can skip this step.
There are primarily 3 methods for ClearIP to distinguish call traffic direction:
- Multiple SBCs are created with unique public IP addresses for each call direction. One or more IP addresses are reserved to only send outbound calls to ClearIP, and a different set of IP addresses are reserved to only send inbound calls to ClearIP.
- Multiple SBCs are created with the same public IP address but different partition values.
- A single SBC is created. Special headers or parameters contained in the SIP Invite are used to identify inbound or outbound calls and are defined in the ClearIP Users page.
1. Multiple SBCs with unique public IP address
In this example, we have two different Operators to distinguish inbound and outbound traffic.  Within each Operator, we have an SBC defined with a unique public IP address. The switch or SBC is configured to use one external IP address to send outbound calls to ClearIP and another external IP address to send inbound calls to ClearIP.
  When creating policies in ClearIP, you would select the appropriate Operator to apply a service on outbound or inbound calls.
2. Multiple SBCs with different partition values
In this example, we have two different Operators to distinguish inbound and outbound traffic.  Within each Operator, we have an SBC defined with a different partition value. The switch or SBC is configured to use one partition to send outbound calls to ClearIP at outbound.sip.clearip.com and another partition to send inbound calls to ClearIP at inbound.sip.clearip.com.
  When creating policies in ClearIP, you would select the appropriate Operator to apply a service on outbound or inbound calls.
3. Single SBC with defined headers
In this example, we have one SBC and one Operator. We have created two Service Providers for Inbound and Outbound calls respectively. 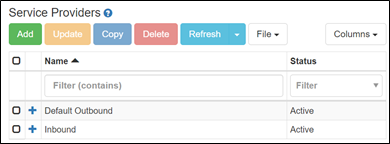
Within each Service Provider, you can define one or more Groups. In the Default Outbound Service Provider, you can create a single Group also named Default Outbound. In the Inbound Service Provider, you should create a Group for every origination carrier you use. The Group name can be set to the name of the origination carrier. 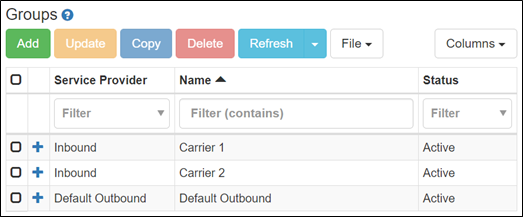
For inbound calls, the netsapiens is configured to automatically add an X-Otg header with the trunk description and P-Source-Device with the source IP address from the origination carrier. The X-Otg value is automatically populated based on the origination trunk description in the netsapiens connection list. Here is an example SIP Invite which includes the X-Otg and P-Source-Device headers for an inbound call.
INVITE sip:18587692585@sip.clearip.com SIP/2.0
Via: SIP/2.0/TLS sip.clearip.com:5061;branch=z9hG4bK0a13.6cc4e3194c643ba4a01e02d3c466ab1c.0;i=dd712e65;received=::ffff:10.0.13.175
Via: SIP/2.0/TCP 34.223.150.220:5060;branch=z9hG4bK19wXBwLdAGqsnyVZ003EE5
Call-ID: 20201120190306061170-6cc082866aafdc5dee7a480c2d339c76
Contact:  <sip:dsfsdfsdf@34.223.150.220:5060;transport=tcp>
CSeq: 201 INVITE
From: <sip:4252007422@10.0.2.188>;tag=Z8UlDt42FevSaOW8003EE4
Max-Forwards: 17
To:  <sip:18587692585@sip.clearip.com>
Date: Fri, 20 Nov 2020 19:03:06 GMT
Server: NetSapiens SiPBx v41-2-1
P-Source-Device: 54.245.86.152
X-Otg: carrier1
Supported: timer
Min-Se: 900
Session-Expires: 1800;refresher=uas
Content-Type: application/sdp
Content-Length: 276
X-Real-Ip: 34.223.150.220

v=0
o=Sansay-VSXi 188 1 IN IP4 162.212.245.32
s=Session Controller
c=IN IP4 162.212.245.47
t=0 0
m=audio 24426 RTP/AVP 0 18 101
a=rtpmap:0 PCMU/8000
a=rtpmap:18 G729/8000
a=fmtp:18 annexb=no
a=rtpmap:101 telephone-event/8000
a=fmtp:101 0-15
a=sendrecv
a=ptime:20
Within each Group, you can define one or more Users.
In the Default Outbound Group, you can create a User named Default Outbound Calls. Set the Service Provider, Group, and Name fields, leave all other fields blank, and submit.
In the Groups for the Inbound Service Provider, you can create Users defined by the trunks used for each origination carrier. The trunks should be defined by either the trunk description or source IP address but not both. Here is an example of inbound users being defined based only on trunk description. The trunk description is entered into the Originating Trunk Group field. This value must exactly match the value passed in the X-Otg header of the SIP Invite, including capitalization and spacing.

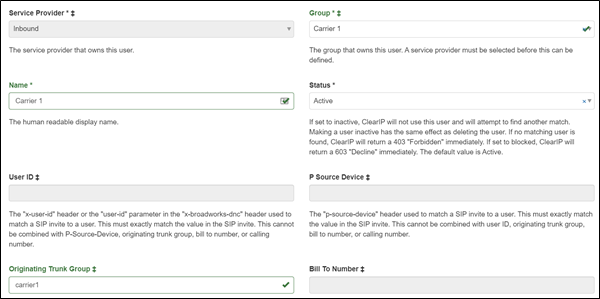
Here is an example of inbound users being defined based only on source IP address. The IP address is entered into the P Source Device field. This value must exactly match the value passed in the P-Source-Device header of the SIP Invite.
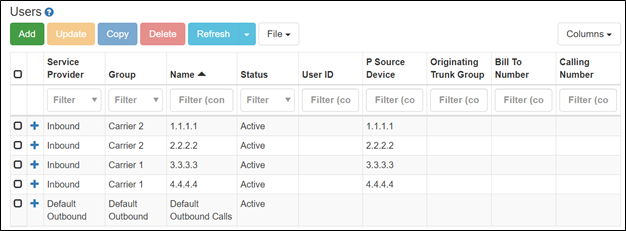
When creating policies in ClearIP, you would select the appropriate Service Provider to apply a service on outbound or inbound calls. Leaving the Group and User fields blank allow the policy to apply to all Groups and Users defined under the selected Service Provider. 
Define Users
You can define users by only one of the following identifiers transmitted to ClearIP in a SIP INVITE message:
- User ID defined by one of the following (ordered from highest priority)
- “X-User-Id” header
- “User-Id” parameter in the “X-Broadworks-Dnc”
- IP address defined by one of the following (ordered from highest priority)
- “P-Source-Device” header
- “Trunk-Context” user parameter in the “Contact” header
- “From” header host
- Originating trunk group (OTG) defined by one of the following (ordered from highest priority)
- “X-OTG” header
- “OTG” URI parameter in the “From” header
- “OTG” parameter in the “From” header
- “TGRP” user parameter in the “Contact” header
- Bill to Number defined by
- “P-Charge-Info” header user
- Calling telephone number defined by one of the following (ordered from highest priority)
- “Diversion” header user
- “P-Asserted-Identity” header user
- “Remote-Party-ID” header user
- “P-Charge-Info” header user
- “From” header user
Note: Capitalization of header and parameter (e.g. “otg”) names does not matter for ClearIP, but capitalization of the values does matter. All values must be less than 256 characters long and only contain numbers, letters, spaces, “#”, “+”, “.”, “,”, “(”, “)”, or “-”.
Example: SIP Invite with User ID
If there is a user defined in ClearIP by the User ID value of 9999, then ClearIP looks at SIP Invites for that User ID value to group calls by the defined user. If multiple User IDs are present in the SIP Invite, the first instance is chosen from the order below.
User ID Method 1: “X-User-Id” header
INVITE sip:18001234567@sip.clearip.com:5060 SIP/2.0
Via: SIP/2.0/TCP sip.clearip.com:5060
From: "Alice" <sip:14045266060@5.6.7.8:5060>;tag=123456789
To: "Bob" <sip:18001234567@1.2.3.4:5060>
X-User-Id: 9999
Call-ID: 1-12345@5.6.7.8
CSeq: 1 INVITE
Max-Forwards: 70
Content-Length: 0
User ID Method 2: “User-Id” parameter in the “X-Broadworks-Dnc”
INVITE sip:18001234567@sip.clearip.com:5060 SIP/2.0
Via: SIP/2.0/TCP sip.clearip.com:5060
From: "Alice" <sip:14045266060@5.6.7.8:5060>;tag=123456789
To: "Bob" <sip:18001234567@1.2.3.4:5060>
X-Broadworks-Dnc: network-address="sip:+14045266060@9.9.9.9;user=phone";user-id="9999"
Call-ID: 1-12345@5.6.7.8
CSeq: 1 INVITE
Max-Forwards: 70
Content-Length: 0
Example: SIP Invite with IP address
If there is a user defined in ClearIP by the IP address value of 9.9.9.9, then ClearIP looks at SIP Invites for that IP address value to group calls by the defined user. If multiple IP addresses are present in the SIP Invite, the first instance is chosen from the order below.
IP Address Method 1: “P Source Device” header
INVITE sip:18001234567@sip.clearip.com:5060 SIP/2.0
Via: SIP/2.0/TCP sip.clearip.com:5060
From: "Alice" <sip:14045266060@5.6.7.8:5060>;tag=123456789
To: "Bob" <sip:18001234567@1.2.3.4:5060>
P-Source-Device: 9.9.9.9
Call-ID: 1-12345@5.6.7.8
CSeq: 1 INVITE
Max-Forwards: 70
Content-Length: 0
IP Address Method 2: “trunk-context” parameter in the “Contact” header
INVITE sip:18001234567@sip.clearip.com:5060 SIP/2.0
Via: SIP/2.0/TCP sip.clearip.com:5060
From: "Alice" <sip:14045266060@5.6.7.8:5060>;tag=123456789
To: "Bob" <sip:18001234567@1.2.3.4:5060>
Contact <sip:14045266060;tgrp=9999;trunk-context=9.9.9.9@5.6.7.8:5060>
Call-ID: 1-12345@5.6.7.8
CSeq: 1 INVITE
Max-Forwards: 70
Content-Length: 0
IP Address Method 3: “From” header host
INVITE sip:18001234567@sip.clearip.com:5060 SIP/2.0
Via: SIP/2.0/TCP sip.clearip.com:5060
From: "Alice" <sip:14045266060@9.9.9.9:5060>;tag=123456789
To: "Bob" <sip:18001234567@1.2.3.4:5060>
Contact <sip:14045266060@5.6.7.8:5060>
Call-ID: 1-12345@5.6.7.8
CSeq: 1 INVITE
Max-Forwards: 70
Content-Length: 0
Example: SIP Invite with OTG
If there is a user defined in ClearIP by the originating trunk group value of 9999, then ClearIP looks at SIP Invites for that originating trunk group value to group calls by the defined user. If multiple OTGs are present in the SIP Invite, the first instance is chosen from the order below.
OTG Method 1: “X-Otg” header
INVITE sip:18001234567@sip.clearip.com:5060 SIP/2.0
Via: SIP/2.0/TCP sip.clearip.com:5060
From: "Alice" <sip:14045266060@5.6.7.8:5060>;tag=123456789
To: "Bob" <sip:18001234567@1.2.3.4:5060>
X-Otg: 9999
Call-ID: 1-12345@5.6.7.8
CSeq: 1 INVITE
Max-Forwards: 70
Content-Length: 0
OTG Method 2: “OTG” URI parameter in the “From” header
INVITE sip:18001234567@sip.clearip.com:5060 SIP/2.0
Via: SIP/2.0/TCP sip.clearip.com:5060
From: "Alice" <sip:14045266060@5.6.7.8:5060;otg=9999>;tag=123456789
To: "Bob" <sip:18001234567@1.2.3.4:5060>
Call-ID: 1-12345@5.6.7.8
CSeq: 1 INVITE
Max-Forwards: 70
Content-Length: 0
OTG Method 3: “OTG” parameter in the “From” header
INVITE sip:18001234567@sip.clearip.com:5060 SIP/2.0
Via: SIP/2.0/TCP sip.clearip.com:5060
From: "Alice" <sip:14045266060@5.6.7.8:5060>;tag=123456789;otg=9999
To: "Bob" <sip:18001234567@1.2.3.4:5060>
Call-ID: 1-12345@5.6.7.8
CSeq: 1 INVITE
Max-Forwards: 70
Content-Length: 0
OTG Method 4: “TGRP” parameter in the “Contact” header
INVITE sip:18001234567@sip.clearip.com:5060 SIP/2.0
Via: SIP/2.0/TCP sip.clearip.com:5060
From: "Alice" <sip:14045266060@5.6.7.8:5060>;tag=123456789
To: "Bob" <sip:18001234567@1.2.3.4:5060>
Contact <sip:14045266060;tgrp=9999;trunk-context=9.9.9.9@5.6.7.8:5060>
Call-ID: 1-12345@5.6.7.8
CSeq: 1 INVITE
Max-Forwards: 70
Content-Length: 0
Example: SIP Invite with Bill to Number
INVITE sip:18001234567@sip.clearip.com:5060 SIP/2.0
Via: SIP/2.0/TCP sip.clearip.com:5060
From: "Alice" <sip:14045266060@5.6.7.8:5060>;tag=123456789
To: "Bob" <sip:18001234567@1.2.3.4:5060>
P-Charge-Info: <sip:14045266060@5.6.7.8:5060>
Call-ID: 1-12345@5.6.7.8
CSeq: 1 INVITE
Max-Forwards: 70
Content-Length: 0